Homelab Revamp 2022 – Part 5 – Migrate, learn & adapt
Only two days after I set up my VSAN node #3 with altered components I learned already a lot of things.
Migration from 2-node VSAN to 3-node VSAN
The migration process was pretty straightforward really. Not much to write about, just follow the VMware guide to Convert a Stretched Cluster to a Standard vSAN Cluster.
It doesn’t include the step to actually add the 3rd node though, but this is kind of obvious. So the quick runthrough I followed and was successful with:
- Add the new node to vCenter, but outside of the cluster.
- Add necessary networking to the new node (Distributed switch, VSAN & VMotion VMKernel interfaces)
- Update all VSAN nodes and the new node to the same patch-level.
- Check that the VSAN is in a good health condition.
- I disabled HA and DRS to avoid side effects (remember to store your resource pool config when disabling DRS – I forgot and needed to recreate it later on)
- On the VSAN configure page, click Fault Domains and disable the stretched cluster. Remove the witness host.
- Delete both fault domains.
- Add the new node to the cluster (just drag & drop it in or use the Quickstart wizard)
- Claim the disks for VSAN (if not done via Quickstart wizard already)
- Check health and repair if this option is available. For me everything fixed itself pretty fast and a lot of data migration happened to the 3rd node.
- Enable HA and DRS again
- You can remove the witness from vCenter if you don’t require it anymore.
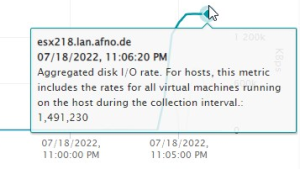
The data migration process is directly kicking in and transferring Terabytes of data to the new node. Speed is really nice for this:

Mainboard
As mentioned in my last post I planned to use a cheaper mainboard option than for node 1 & 2.
However, I had two issues with this mainboard. One with the not fitting front-USB connector (because of my 10G NIC and the positioning on the board) and one with the board not shutting down the system when I order a software shutdown but instead just rebooting the system.
I could ignore the first but the latter is an issue, so I reverted back to my initial mainboard choice and got another Gigabyte B550M AORUS Pro-P for node #3.
CPU
I’ve wanted to use the Ryzen 5700X over the previous chosen Ryzen 5700G but I was surprised to see such a difference in power consumption for two 65W TDP CPUs. In the initial high-load phase of VSAN rebalancing and moving data to the third node the peak power consumption was already much higher than for the two other nodes and unfortunately that stayed the same when the system was almost idling.
plug1 is the Shelly Plug S to which the 3rd node is connected. plug11 and plug 3 are nodes 1 and 2, plug8 is the witness host which I already shut down. Let’s have a look on some consumption diagrams:
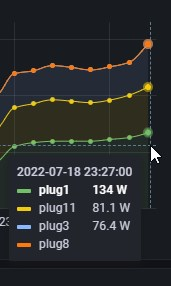
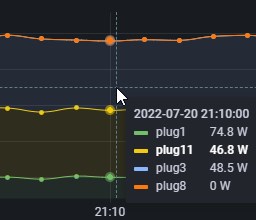
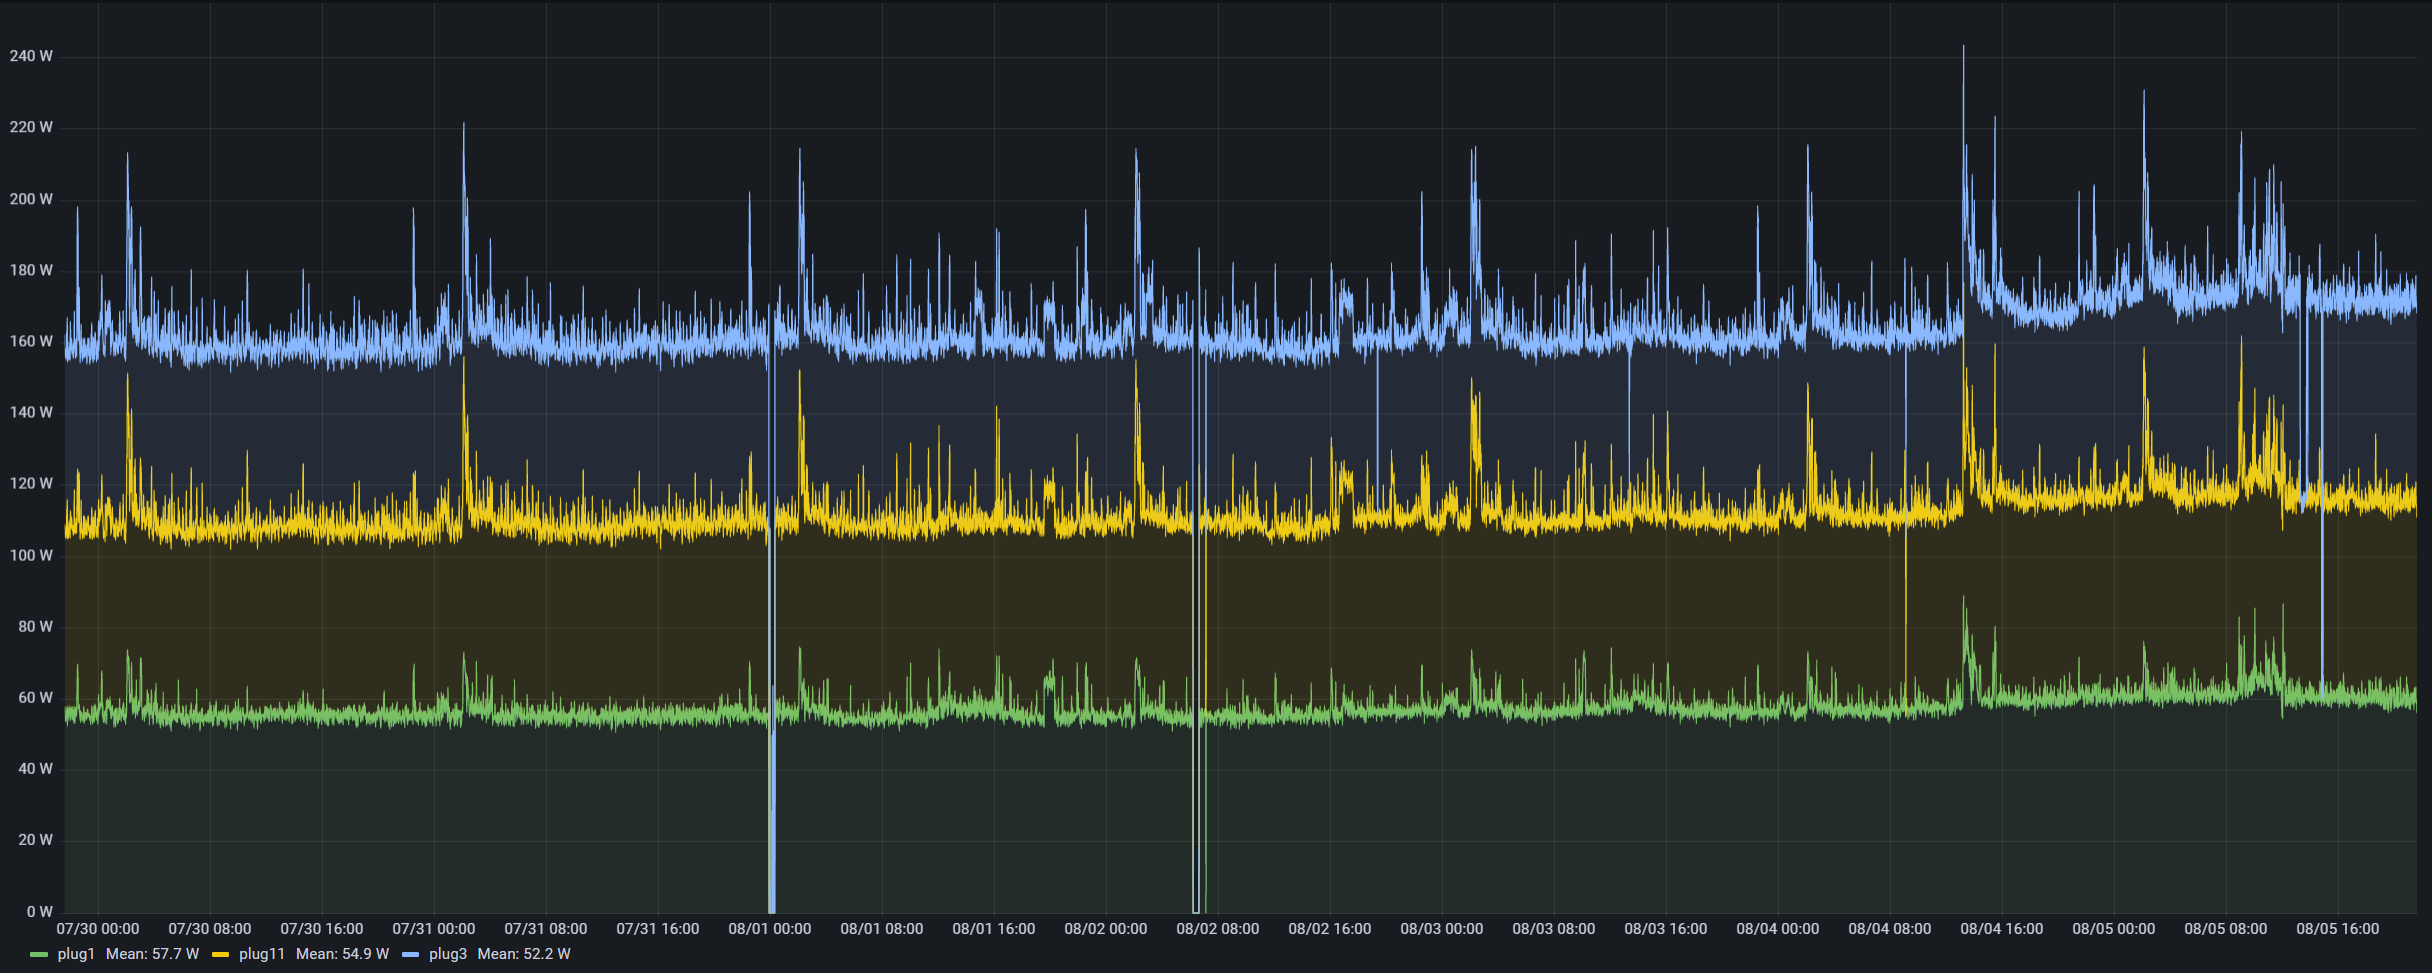
So during resync the Ryzen 5700X consumes about 50 to 60 watts more than the 5700G nodes. Yes, it’s a different load profile as node 3 is writing and the others are just reading, but they are still stressed. I assume the PCIe 4 bridge takes some of this and the cache NVMe which takes the writes is PCIe 4.0 connected. I was a little shocked of the difference but could live with that as high load is not the default in my lab.
In maintenance mode all nodes look quite similar in concerns of consumption. But you have to consider that only node 3 (= Ryzen 5700X = plug 1) is in maintenance mode. And it still consumes with zero load more than the other nodes. These two have both full memory and ~30% CPU consumed.
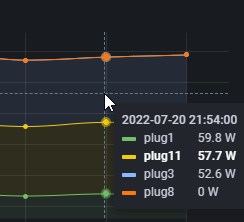
The worst diagram for me, however, is the normal operations consumption. All three VSAN nodes are active and have some VMs running. There’s no special load on them, everything is basically idling. In this situation the Ryzen 5700X consumes about 20-25W more than the other two nodes. As this is 24×7 this quickly sums up to about 50 EUR of energy cost per year (with my current energy prices which are still quite cheap compared to the market).
This disqualifies the 5700X in my eyes. Initially I thought it might be even better than the 5700G because it doesn’t need to power any kind of graphics component, but I was totally wrong here. I change back to my initial choice of the 5700G (which then makes the more expensive mainboard with the display port connector more reasonable, too).
Summary
For god’s sake I should finally learn: Never touch a running system. But I am always striving to test & learn new things, so I guess I’d do it again the same way in the future.
This time, however, from the three BOM changes I made only one remains and this is the be quiet! Pure Rock 2 CPU fan. With this one I am really happy. It looks much better suited than the Arctic Cooler I have in nodes 1 & 2 and is still reasonable priced.
Overall the node price stayed roughly the same because of the same components but some market price changes in or against my favor. This leveled out in the end.
The power consumption for all nodes is quite the same and performance rocks. The issues with re-booting nodes reduced a lot (though I still see it from time to time and still don’t know why).
Power consumption wise the nodes are quite the same and the mean for all nodes is below 60W. So the whole cluster takes about 170-180W in normal production.

All over I am very happy with the choice and the three node system fits me really good.
WIth this I am finishing this series but of course will post updates on my environment and learnings. Thanks for reading!