Migration: vSphere with VSAN to Proxmox with Ceph
I recently had an issue with one of my cluster nodes always rebooting after some minutes. This came into a period where I didn’t have much time because of personal life and job change.
Out of this situation I decided two things:
- Change my 3-node VSAN cluster back to a stretched 2-node VSAN cluster
This was intended as a “quick win” action – I didn’t need the capacity of all three nodes anymore but wanted redunancy back.
You can read about my 3-node VSAN cluster in Homelab Revamp 2022 – Part 5 – Migrate, learn & adapt and the posts before. - Change from a vSphere VSAN cluster to an open source virtualization cluster
The motivation of this decision came out of- My job change – I am not requiring the vSphere lab anymore to learn & play for work related stuff on my new job (I guess).
- vSphere becoming more and more difficult to run on consumer hardware and I had issues with the latest updates.
- A will to play with other stuff than vSphere 🙂
I was always interested in Proxmox – I think it’s a cool solution, I like the built-in web-based management and the ease of operations. However, I didn’t use it in my own “production” so far.
So Proxmox was set for the virtualization layer and I looked into options to run a hyperconverged cluster – which brought me to the use of CEPH.
Downsizing: 3-node VSAN to Stretched Cluster
As I am writing this article up from memory I can’t exactly remember which guide I followed or what caveats I encountered. Overall I remember it to be running quite smooth and on a high level I did the following:
- The 3rd node was offline anyways because of the defect hardware and the cluster was in degraded mode.
- I configured two fault domains and assigned the remaining hosts
- I removed the faulty node from vCenter
- I deployed a witness VM and brought it into vCenter (it is running on the VSAN cluster, so that’s not optimal but only temporarily anyways)
The result of this was lots of VSAN copying actions between the two nodes to sync but also a still faulty cluster, because I wasn’t able to update all the nodes to the same vSphere version out of issues with my consumer hardware. However, I kept the cluster running as it was and it was good.
Predecessor: Starting the Proxmox Cluster
When I finally had found and fixed the root cause on the failing node (it was a CPU error… heck, that was the last thing I tested because I didn’t expect that) I cleaned it and installed Proxmox on the boot disk.
I am still using the same hardware as described in Homelab Revamp 2022 – Part 3 – The BOM. As a quick reminder: Ryzen 5700G 8C/16T on B550M motherboard; 128GB RAM; 1x 1TB NVMe Aorus Gen4 ; 2x SATA Samsung 870 EVO 4TB capacity flash drives and some 128-480GB SATA SSD as boot drive.
Again a high level overview from memory. There’s lots of detailed guides available, including the official Proxmox documentation on the Hyper-Converged Ceph Cluster.
- Install Proxmox
- Configure community repositories for Proxmox and Ceph
- Install & configure Ceph (including adding managers and monitors)
- Create OSDs
- Add Each 4TB capacity SSD is one OSD
- The DB disk is the 1TB NVMe and I let Ceph handle the size for it (the NVMe can be chosen as DB disk for both OSDs)
- I read later on: When not choosing a WAL disk but a DB disk, the WAL will be placed on the DB disk as it’s expected to be the faster disks (NVMe vs SATA SSD – check!) so there’s no reason in my case to choose the WAL disk.
- Create a new pool
- I kept almost everything at the defaults, but I needed to change the
SizeandMin. Sizesettings:
Size needs to be 2 – I only want 2 copies of the data, not 3. This is the same setting as I used before in my VSAN.
The Min Size needs to be 1, because with a single node I cannot reach 2 yet and some actions will fail (e.g. creating CephFS) would fail when the Min. Size can’t be reached. - Yes, a Min. Size of 1 will mean potential data loss (and Proxmox warns of this) – I might look into changing this when I have 3 nodes in the cluster.
- I kept almost everything at the defaults, but I needed to change the
- Create a new CephFS
- It uses the already created pool and you need to deploy a metadata server (MDS) – if it doesn’t get active you might not have configured the correct Min.Size for the pool (see above).
I felt this was really straightforward and all very well documented and explanatory from the GUI. The next step is to make the the Ceph pool available to Proxmox to store VM disks on and CephFS available for ISOs and backups.
Actually this was really something I needed to look up – adding storage happens on the “Datacenter” node level in the Proxmox UI – but as soon as you found it it’s very self-explanatory:
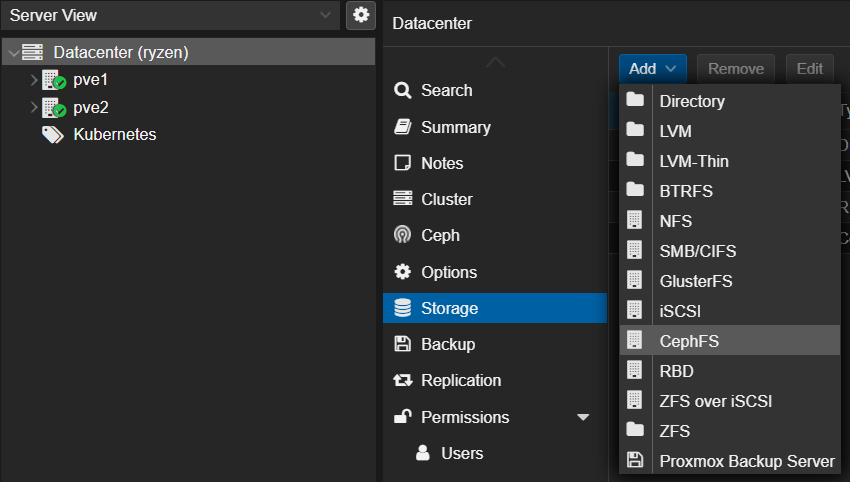
Now I had a single node Proxmox with a single node Ceph cluster running.
Migration: Move workloads from VMware to Proxmox
There might be multiple ways of doing this, but as I worked for Veeam and know the product I thought of this way first and found it quite easy to follow:
Create backups of your vSphere VMs with the Veeam Agent for Windows or Veeam Agent for Linux. Both are available for free after registration and you can even use the free Veeam Community Edition if you want.
The agent backups areimportant because I need to restore the VMs as “bare metal” on the Proxmox KVM hypervisor:
- Create an empty VM shell in Proxmox which follows the settings of the vSphere VMs (same number and size of disks, NICs, BIOS/UEFI boot mode, …)
One thing I learned here: Use a virtualized CPU model – even with having the same CPUs across the nodes I experienced shutdowns of the VMs when live-migrating them. I am usingx86-64-v3which is the newest feature set my CPUs support. You can read more about this in the documention for qemu CPU models. - Create a Veeam Recovery ISO for Windows from the backup or from within one of the Windows vSphere VMs
- Download the Veeam Linux Recovery ISO in the latest version
- Mount the Recovery ISO based on whether you want to restore a Windows or Linux system to the Proxmox VM.
- If you’re restoring a Windows VM and you want to use the virtio devices (e.g. virtio-scsi and virtio-net), then make sure to download the latest virtio ISO and mount it to the VM, too.
- Boot the recovery ISO, load drivers if required (Windows/Virtio) and also include them in the restore, then restore the disks as they were before. Follow the Veeam guides for this.
When the VM is restored I performed some post work:
For Windows VMs (which I all installed with virtio-scsi and virtio-net)
- Bring data disks in
diskmgmt.msconline – the boot disk should already work with the driver given during the restore. - Reconfigure the network – the new virtual NIC is unknown. If you had a static IP you have to reset it (Windows will ask if you can take it from the previous adapter).
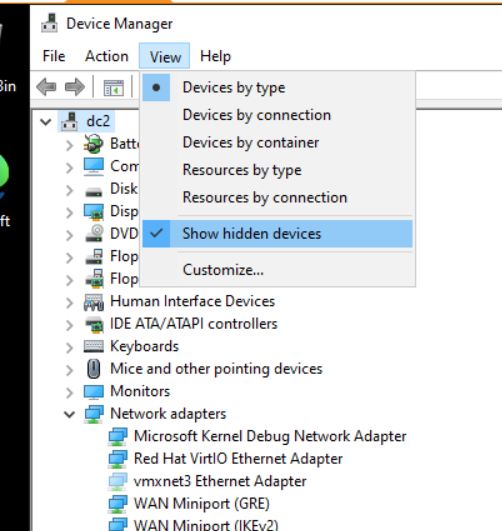
- If you want you can open the device manager and enable “Show hidden devices” beneath the View menu. This will show the old vSphere hardware which is not present anymore, e.g. vmxnet3 Network devices. You can safely remove these which would also clear their static network configuration if present
- You should also remove VMware Tools
- And install the Qemu-Guest-Agent/Virtio drivers via the installer available on the virtio-ISO.
For Linux VMs you usually do not need to inject the virtio drivers as these are part of the kernel.
- Reconfigure the initrd to include the virtio-scsi drivers (I only had this once with my OpenSuse Rancher-VM)
- Reconfigure networking as device names change (e.g.
eno18instead ofvmx1) - Remove VMware Tools (
open-vm-toolspackage) - Install
qemu-guest-agentpackage
If you want to continue taking Veeam backups of these KVM VMs you can do so by using the Veeam agents. However, be aware that after the migration the Veeam agent recognizes the system as a new one and will not continue your previously created backup chain but start a completely new one.
Hence you might need a lot of backup space (or delete the old chains of the vSphere VMs).
Migrating the second cluster node
After I migrated the first workloads to the Proxmox node I was able to shift the remaining vSphere workloads to a single node and migrate another node to Proxmox. Again a high level overview from memory:
- Put the VSAN node into maintenance mode and ensure accessibility of VSAN data
This kicked a lengthy VSAN sync in my case but was good. - Shut down the VSAN node, clean it and install Proxmox – now you don’t have any more VSAN redundancy (just a single node with the witness VM running on it) and you still don’t have redundancy in the Proxmox/Ceph cluster (single node so far).
- Create a cluster in Proxmox and add the second node
- Install Ceph on the second node and join the Ceph cluster. Lots of copying will happen now to sync the data between the ceph nodes and make it redundant.
You can then start to balance the workloads between the Proxmox nodes by migrating VMs or LXC containers… and here’s the first thing I was missing from vSphere: DRS. I don’t want to do the manual migration….
Updates & Conclusion
The migration so far went quite good without big surprises. Within or shortly after these migration steps I already needed to run the first upgrades on the Proxmox cluster and test it’s resilience on this part. I upgraded the Ceph version from Quincy (17.2) to Reef (18.2) and also Proxmox VE itself (from 8.0 to 8.1). Both updates went as expected without issues and fully online.
The next steps are to migrate the remaining workloads – that’s mostly Kubernetes with vSphere CSI and move the last node to the Proxmox cluster – and write more articles about my learnings and this process.